Cropping And Bleed
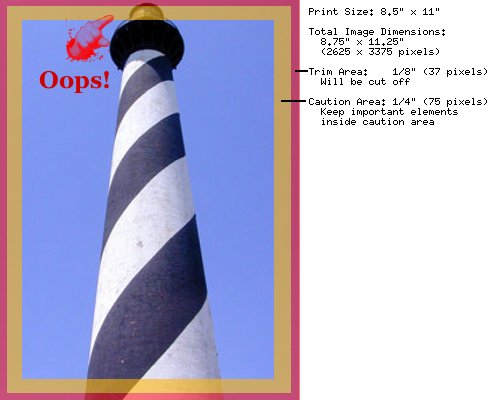
When loading your own image layouts it is very important to understand how professional printers print to the edge of the paper. In the printing and binding process , each piece of paper can shift up to 1/4" from the previous page so you need some "extra" image to allow for cutting all pages neatly. To do this, the printer prints the image slightly larger than the end result. This extra printing, called the "trim area" or "bleed"(see image below), is then cut off. This results in full paper coverage, though a very small amout of the original image will be trimmed. The trim area for Photo Books, Eh! is 1/8" on all sides.
In addition to the standard trim area, we advise an extra 1/4" (6mm) bleed on all 4 edges of the picture. This is called the "caution area". This means there should not be any important visual elements (text, faces) on the outer 3/8" (1/8" trim + 1/4" caution) of your image. If your layouts go too close to the edges, make small adjustments with your local software to move elements towards the center. You can then simply "Upload Replacement Image" when editing any photo and that will not affect your image order.
IMPORTANT NOTE: please make sure you don't have anything important in the caution area.
It's most important that you receive the exact book you want. We definitely don't want you disappointed if our wild and crazy printer gets a bit frisky with the trim cutter and nips the edges off your beautiful layouts.


In addition to the standard trim area, we advise an extra 1/4" (6mm) bleed on all 4 edges of the picture. This is called the "caution area". This means there should not be any important visual elements (text, faces) on the outer 3/8" (1/8" trim + 1/4" caution) of your image. If your layouts go too close to the edges, make small adjustments with your local software to move elements towards the center. You can then simply "Upload Replacement Image" when editing any photo and that will not affect your image order.
Uploading Images
When you use the Photo Books, Eh! Book Maker to create a PDF of your gallery images it handles the trim area for you. It will scale your images the extra 1/8" on all sides automatically. This is by far the easiest path and what we recommend for all users.IMPORTANT NOTE: please make sure you don't have anything important in the caution area.
Uploading PDF's
If you are uploading a PDF you created, beware! This method is very dicey, and full of complications. Your PDF needs to allow an extra 1/8" on each side. That is an extra 1/4" total to height and width. For example, the PDF for a 9"x7" photo book needs to be 9.25" x 7.25".It's most important that you receive the exact book you want. We definitely don't want you disappointed if our wild and crazy printer gets a bit frisky with the trim cutter and nips the edges off your beautiful layouts.
| Photo Book Size | PDF Size |
| 6x9 | 6.25"x9.25" |
| 9x7 | 9.25"x7.25" |
| 8.5"x11" | 8.75"x11.25" |
| 14"x11" | 14.25"x11.25" |
Diagram and example of what *NOT* to do...
Here is an example of an image that does not have enough trim area and the printer chops off the top of this lovely lighthouse.
Diagram and example of what *TO* do...
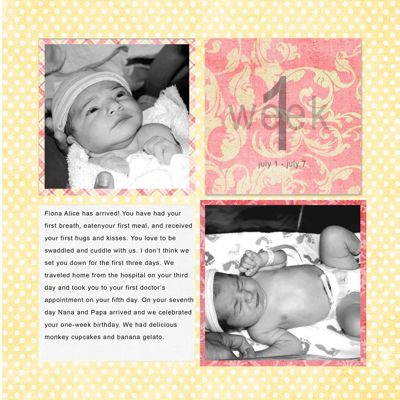
Here is an example of an image that DOES have enough trim area and the printer will only trim the polka dot area which is exactly what the creator would like. She kept all important elements away from the outer area and bled her background area out to the edge.